Booster Pump Blog |
 Boosting agricultural productivity is a critical goal for farmers and growers around the world, and booster pumps play a vital role in achieving this objective, especially in the context of irrigation systems. Here's an in-depth exploration of how booster pumps contribute to enhancing agricultural productivity through efficient irrigation: 1. Efficient Water Distribution:
2. Overcoming Elevation Challenges:
3. Maximizing Crop Yield:
4. Water Efficiency:
5. Customizable Irrigation Schedules:
6. Rapid Coverage:
7. Hydroponic and Greenhouse Farming:
8. Frost Protection:
9. Scaling Operations:
10. Remote and Off-Grid Farming:- In remote or off-grid areas, booster pumps can be powered by alternative energy sources like solar panels or wind turbines. - This enables irrigation in areas with limited access to conventional power infrastructure 11. Sustainable Agriculture:- By optimizing water use and minimizing wastage, booster pumps contribute to more sustainable agricultural practices. - Efficient irrigation reduces environmental impact and promotes long-term soil health 12. Tailored Solutions:- Booster pump systems can be customized to suit specific crop types, soil conditions, and farm layouts, providing tailored solutions for diverse agricultural needs.
Incorporating booster pumps into irrigation systems empowers farmers to manage water resources effectively, improve crop yield and quality, and contribute to food security. As agriculture continues to face challenges related to water scarcity and climate variability, booster pumps remain a valuable tool in enhancing agricultural productivity and sustainability. For more info contact booster pump suppliers in uae or call us at +971 4 252 2966
0 Comments
 Selecting the right booster pump is a critical decision that can significantly impact water pressure and flow in various applications, from residential settings to commercial and industrial environments. In this comprehensive guide, we will navigate through the essential factors to consider when choosing a booster pump, ensuring that you make an informed decision that aligns with your specific needs and requirements 1. Understanding Your Water Pressure Requirements:Begin by determining your current water pressure and the desired pressure increase. Assess your specific needs, such as household usage, irrigation, or industrial processes, to establish the level of pressure enhancement required. 2. Identifying the Application: Residential, Commercial, or Industrial:Explore how the intended application influences the type of booster pump you need. Discuss the distinct demands of residential, commercial, and industrial settings and the pump options best suited for each 3. Flow Rate Considerations: Gallons per Minute (GPM) Matters:Explain the importance of flow rate (GPM) in tandem with water pressure. Different applications have varying flow rate requirements, so matching the pump's capabilities to the demand is crucial. 4. Types of Booster Pumps: Single-Stage vs. Multi-Stage:Compare single-stage and multi-stage booster pumps, highlighting their differences in pressure output and applications. Discuss scenarios where each type is most effective. 5. Pump Material and Construction: Durability and Compatibility:Examine the materials used in pump construction, emphasizing corrosion resistance and compatibility with the fluids being pumped. Consider the implications of pumping corrosive or abrasive liquids. 6. Energy Efficiency: Balancing Performance and Consumption:Discuss the energy efficiency of booster pumps and how it impacts operating costs over time. Highlight energy-saving features and the importance of selecting a pump with the right motor size for optimal efficiency. 7. Noise Level: Ensuring a Quiet Operation:Address the concern of noise generated by booster pumps, especially in residential environments. Discuss noise reduction measures and the importance of choosing pumps designed for quiet operation. 8. Installation and Space Constraints: Size and Placement:Guide readers on the importance of considering installation space, including height restrictions and available room for the pump and associated components. 9. Maintenance and Serviceability: Longevity and Ease of Care:Explain the significance of easy maintenance and access to pump components. Discuss features that simplify maintenance and the importance of routine upkeep. 10. Budget and Cost Considerations: The Total Investment:Delve into the budgeting process, covering not just the initial pump cost but also installation expenses, ongoing energy consumption, and maintenance requirements. 11. Seeking Expert Advice: Consulting Professionals for Guidance:Highlight the value of seeking advice from pump experts or professionals in the industry, especially for complex applications or unique requirements.
Choosing the right booster pump is a critical decision that hinges on various factors. By comprehensively evaluating your water pressure needs, flow rate requirements, and considering aspects like pump type, energy efficiency, and maintenance, you can confidently select a booster pump that aligns perfectly with your specific needs. This guide equips you with the knowledge needed to make an informed choice, ensuring optimal performance and efficient water management in your chosen application. For more info contact booster pump suppliers in uae or call us at +971 4 252 2966.  A consistent and adequate water pressure is essential for various household activities, from taking a refreshing shower to efficiently running appliances. Yet, many homeowners face the frustration of low water pressure, impacting their daily routines. Enter booster pumps, a reliable solution to enhance water flow and ensure optimal pressure throughout your home. In this blog, we'll dive into the world of booster pumps, exploring how they work, their benefits, and how they can transform your water usage experience at home. 1. Understanding Water Pressure: The Basics:Begin with an explanation of water pressure, discussing how it's measured and the factors that influence it, such as elevation, plumbing system design, and local water supply conditions 2. The Low Water Pressure Dilemma: Challenges and Consequences:Detail the issues that arise from low water pressure, including slow-filling appliances, weak showers, and inadequate irrigation, underscoring the impact on daily life and household functionality. 3. Enter the Booster Pump: How It Works:Explain the mechanics of booster pumps, describing how they increase water pressure by efficiently boosting the flow of water through pipelines. Include a simplified diagram to illustrate the pump's operation 4. Types of Booster Pumps: Choosing the Right One:Explore different types of booster pumps available, such as single-stage and multi-stage pumps, as well as the importance of selecting the right pump based on your home's specific water pressure needs 5. Installation Process: DIY or Professional Help?Walk readers through the process of installing a booster pump, outlining the steps involved and discussing whether it's a suitable DIY project or if professional assistance is recommended. 6. Benefits Beyond Water Pressure: Additional Perks of Booster Pumps:Highlight the ripple effects of improved water pressure, such as shorter wait times for hot water, more efficient irrigation, and enhanced performance of appliances like washing machines and dishwashers. 7. Addressing Concerns: Noise, Energy Consumption, and Maintenance:Provide insight into common concerns associated with booster pumps, addressing potential noise issues, energy efficiency considerations, and the importance of regular maintenance. 8. Real-Life Success Stories: Homeowners' Experiences with Booster Pumps:Share anecdotes from homeowners who have successfully integrated booster pumps into their water systems, showcasing the positive impact on their daily routines and overall satisfaction 9. Budget-Friendly Tips: Boosting Water Pressure Without Breaking the Bank:Offer cost-effective alternatives and strategies for improving water pressure before considering a booster pump, catering to readers who may have budget constraints 10. The Path to Optimal Water Pressure: Making the Right Choice:Sum up the blog by emphasizing the importance of optimal water pressure for a comfortable and functional home, and encourage readers to make an informed decision about using booster pumps to enhance their water flow experience.
Booster pumps have emerged as a game-changer in addressing low water pressure concerns at home. By delving into their inner workings, benefits, and considerations, this blog aims to empower homeowners with the knowledge to make the best choice for achieving optimal water pressure and ensuring a smoother, more efficient household water usage experience. For more info contact booster pump suppliers in uae or call us at +971 4 25 22 966. 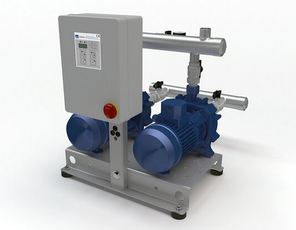 Boosters pumpsets offer several benefits that enhance water supply systems and ensure optimal performance. Here are some key advantages:
For more info contact booster pump suppliers in uae or call us at +971 4 252 2966 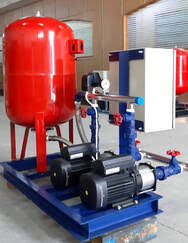 A multistage booster set is a system consisting of multiple pumps arranged in series, with each pump boosting the pressure of the water passing through it. These systems are typically used in applications where higher water pressure is required, such as in buildings with multiple floors or in industrial processes that require high-pressure water.
Multistage booster sets are often used in conjunction with a pressure tank, which helps to regulate the pressure of the water in the system. When water is needed, the pumps turn on and begin to pump water through the system, increasing the pressure until the pressure tank reaches its set point. At this point, the pumps turn off and the pressure tank maintains the pressure until more water is needed. There are several advantages to using a multistage booster set, including:
However, there are also some potential disadvantages to using a multistage booster set, including increased complexity, higher installation and maintenance costs, and potential issues with pump synchronization. For more info contact booster pump suppliers in uae or call us at +971 4 252 2966 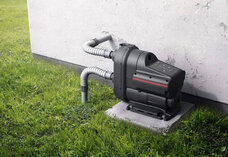 The pressure of a booster pump is typically measured in pounds per square inch (PSI) or bar. The specific pressure requirements of a booster pump system will depend on various factors, such as the intended application, the size and layout of the building or property, and the required flow rate.
To determine the appropriate pressure setting for a booster pump, it is important to consider the following:
Consulting with a professional plumber or pump technician can be helpful in determining the appropriate pressure setting for a booster pump system based on the specific requirements of the application. For more info contact booster pump suppliers in uae or call us at +971 4 252 2966 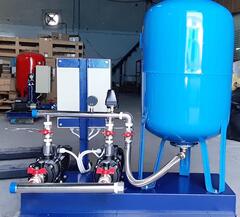 A pressure vessel is a container designed to hold fluids or gases at a pressure different from the ambient pressure. In the context of a booster pump system, a pressure vessel is commonly used to store water under pressure so that it can be distributed to the required outlets at a consistent pressure.
The pressure vessel in a booster pump system typically consists of a steel tank that is designed to withstand the high pressure of the water inside. The tank is equipped with a bladder or diaphragm that separates the water from the air inside the tank. As water is pumped into the tank, it compresses the air, increasing the pressure inside the tank and providing a reserve of pressurized water that can be used when demand spikes. The advantages of using a pressure vessel in a booster pump system include:
For more info contact booster pump suppliers in uae or call us at +971 4 252 2966 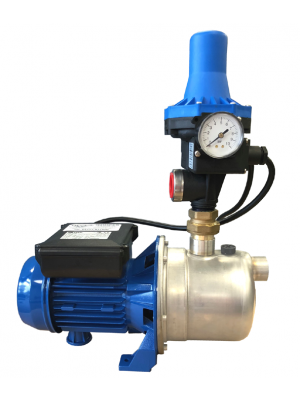 Booster pumps can sometimes produce noise that can be bothersome, especially if the pump is located close to living spaces or bedrooms. Here are some common causes of booster pump noise and potential solutions:
For more info contact booster pump suppliers in uae or call us at +971 4 252 2966 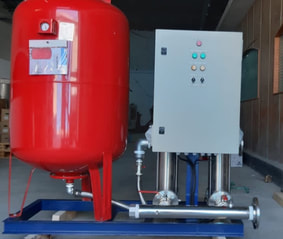 Booster pumps are commonly used in environments such as apartments, hotels, schools, leisure centres and other buildings where it is essential that all outlets have access to adequate water pressure. Unfortunately, booster pumps can experience problems; especially when they are not properly maintained. Booster pumps underperformance or complete failure can be extremely disruptive and often results in some or all building occupants having no access to water or experiencing low pressure. In environments such as apartments, a booster pump failure could mean that residents do not have sufficient pressure to carry out essential daily tasks such as having a shower, flushing the toilet or using their taps. To prevent this, our latest blog post takes a look at 7 problems with booster pumps and how you can fix them. The most common problems with booster pumps include:
Pump Won’t Start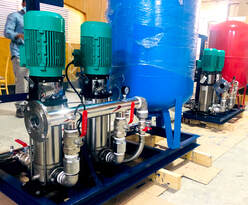 A booster pump that won’t start means that water will not be available to any outlet fed from the pumps. There are several reasons why a booster pump doesn’t start including a lack of power, water in the break tank, tripping, sensor failure, problems with the control panel and motor failure. Firstly if there is a power cut then the pumps won’t run and there will be no water delivered. When the electricity is reinstated the pumps might need to be reset to work, if in doubt please call our professional engineers for further assistance. If the ball valve has failed in the break tank and the pumps are fitted with low level protection then the pumps won’t start. Check the tank has water. If these have been checked the other potential causes can be difficult to fix the issue without sufficient knowledge and expertise of booster pumps. Therefore, it is recommended to arrange a full inspection from a pump engineer. High Running NoiseA high running noise from your booster pump is not only a sign of potential problems, but can also be frustrating for building users as they may be woken or otherwise disturbed by the higher operating noise. There are several reasons why a booster pump can make excessive noise including high demand, incorrect positioning, worn or old components and excessive vibration from the pump or pipework within the building. Along with regular maintenance, it’s possible to prevent noise from your pump by ensuring it can meet demand and using vibration isolators such as vibration mats, bases, and springs. To find out more about this problem, take a look at our blog post on best practice for controlling noise in booster pumping systems. Leaking from PumpLeaking from your booster pump reduces its effectiveness and can result in more serious problems if not addressed. Leaks can be caused by issues such as broken valves, worn or cracked seals and the water pressure being too high. To determine the cause of the leak, we recommend carrying out an inspection of the pump and its components. If you are unable to identify the issue, a full service should be arranged with a pump engineer. If you are responsible for the maintenance of a booster set, take a look at our free booster pump maintenance inspection checklist which covers the key components of the pump that should be inspected regularly. ContaminationContamination is a serious issue in any pumping system, but even more so with a booster set where end users are likely to be using and drinking the water it’s distributing. Contamination can be caused by inadequate cleaning of the pump or failing to manage the maintenance requirements of the cold water storage tank. If there is contamination within the pump, it should be switched off immediately and a full inspection should be arranged with an engineer who can test, clean and disinfect the cold water tank. Low Water PressureThe primary purpose of booster pumps is to increase the pressure of water, so it’s an immediate cause for concern if low water pressure is experienced. A drop in pressure could be caused by high demand, the age and suitability of the pump, a faulty sensor, valve failure or a leak. We recommend carrying out a visual inspection on the unit before arranging an inspection by an engineer who can assess whether a repair is required or whether the pump is no longer up to the job and needs replacing. To find out more about what causes low water pressure and how you can improve it, take a look at our blog post on how to improve water pressure. High Operating CostsIf you have noticed an increase in operating costs, it may not be down to increasing energy prices alone. As pumps age, they become less efficient; particularly if they are not being professionally maintained. With the new features offered by modern pumps, upgrading can offer potentially thousands in cost savings whilst providing a better experience for residents and reducing your carbon footprint. If your bills are increasing, we recommend arranging a pump energy check. This check gives you an accurate view of current pump performance and can calculate whether any cost savings could be made by upgrading the unit. Pressure too HighWhen a pumps pressure is too high, it puts unnecessary strain on the pump and pipework without offering any real benefit to the users of the building.
One of the most common reasons for the pressure being too high is the pressure relief valve (PRV) which controls pressure being set too high or being stuck open. If your pressure is running too high, we recommend checking the pressure gauge and manually reducing the pressure if required. If the PRV does not close or the pressure will not decrease, organise an inspection from an engineer. For more info contact booster pump suppliers in uae or call us at +971 4 252 2966  It is quite a tough job to determine whether or not your shower requires a water pressure booster pump. Usually, a booster pump is needed if your shower has very low water pressure. However, at times shower heads can change the force of the spray, and you will feel that the lack of a water pressure booster pump is the issue. That is why you require a systematic way to check if you require a booster pump. Go through the following 3-step instructions to examine your water pressure:
Choosing the Best Pressure Pump for Shower There are a few factors you should consider before purchasing the desirable booster pump: Pressure Rating While selecting your pressure pump for a shower, you will observe that each comes with a pressure rating, for example, 2 bar booster pumps. The common booster pump sizes that you can choose are:
Build Quality Whether you are looking for an indoor water pressure booster pump or an outdoor water pressure booster pump, it is necessary to select a firm pump that can last the tough conditions for an entire year. The materials of the booster pump should be able to resist different temperatures. You can see the relevant details in the product stipulations. Booster pump suppliers in uae makes sure healthy, hygienic and plastic-free water. Single or Twin Booster pump Next, you must select between a single booster pump and a twin booster pump. A single booster pump is designed to boost just one feed. Although it can be used for mixed water feeds or cold water feeds, this pump is usually hot water feed. On the other hand, a twin booster pump increases the water pressure in mixed water feeds. Hence this type of pump is usually the preferable option. Installation Most booster pumps are easy to install. However, others may need expert help as the installation process can be difficult. You should keep in mind to ensure your warranty will not become invalid if you want to install it alone. Some manufacturers need certified professionals to install the booster pump to keep the warranty effect. Additionally, Booster pump suppliers in uae water softener solution for home softens your hair, ensures the expensive faucets last long and improves the efficiency of geyser and heating system. For more info contact booster pump suppliers in uae or call us at +971 4 252 2966 |
AuthorWrite something about yourself. No need to be fancy, just an overview. Archives
August 2023
Categories |
 RSS Feed